Let’s face it - when you’re working with multiple athletes or clients in one Group, communication can get messy. While some people need access to everything, others don’t.
That’s where Group Permissions come in.
With our latest update, you can now customize permissions for each individual channel within a group, giving you complete control over what your members can see, do, and interact with.
This might sound simple, but it’s key to running organized, secure, and streamlined communication inside CoachNow.
Why Channel-Level Permissions Matter
Whether you're running a read-only Group, creating a community Q&A, or offering one-on-one feedback sessions, you can customize each channel's permissions to support your specific goals.
Here are a few real-world examples:
-
Create Read-Only Libraries: Lock your main content channels (like training templates, drills, or videos) so members can view, but not reply, post, or clutter up your space.
-
Enable Community Interaction: Add a dedicated channel where members can post and reply - perfect for Q&A, peer feedback, or general discussions.
-
Run One-on-One Chats Within a Group: Set up private channels for individual athletes (e.g., “Feedback for Alex”) and customize their permissions for personalized, secure communication.
How to Set Up Group Permissions (Step-by-Step)
Ready to dive in? Here’s how to manage group and channel permissions across devices:
On Desktop/Web:
1. Go to your Group.
2. Click on the gear icon in the top-right corner (Group Settings).
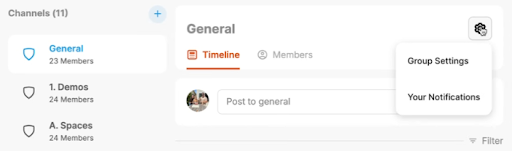
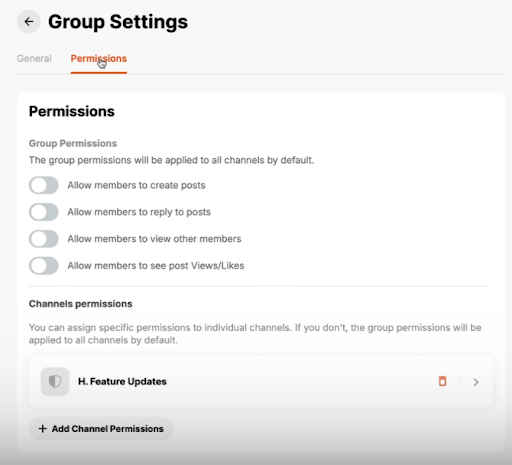
3. Select Permissions.
4. From here, you can:
-
-
Edit permissions for existing channels
-
Add new channels with unique permissions
-
Choose whether members can post, reply, view members, etc.
-
On Mobile:
1. Open your CoachNow app and navigate to the desired group.
2. Tap the gear icon (top-right) and choose group settings.
.png?width=342&height=99&name=unnamed%20(1).png)
3. Tap Permissions.
.png?width=276&height=245&name=unnamed%20(2).png)
4. Set or adjust channel-level permissions just like you would on desktop.
.png?width=214&height=334&name=unnamed%20(3).png)
Let’s say you’ve got a group where your members can view your content, but they can’t engage.
In case you do want to build some community, you can:
-
Create a new channel (maybe called “Q&A” or “Community Chat”)
-
Head to Permissions, and enable Post and Reply for that specific channel
Whether you're managing a large training group, building a digital course, or offering premium coaching access, permissions give you the control you need to scale communication without chaos.
Now, you decide who can do what, and where.
Start experimenting with channel-level permissions and design your group experience exactly how you want it.
Have questions or want help setting it up? We’re here to help.